Revitalizing Malden High School’s Workbenches
Jonathan Rooney:
One of the largest engineering spaces currently missing from the Tufts campus is a student-accessible wood shop. But over at Malden High School, professors and Tufts students are working to create a fully-equipped wood shop/makerspace in Nedlam’s Workshop, a mere ten-minute drive from Tufts. Several of us spent the last few days there learning about the tools and working to improve the space, cleaning it up and creating new and improved work spaces around the shop. My team’s particular focus was the shop’s four solid maple workbenches, each of them a beautiful butcher’s block work surface covered in years of varnish, paint, and grime. Our task was to clean up and stabilize the decrepit worksurfaces and solidly remount the woodworker’s vices loosely hanging off each bench.
A quick experiment with a planer and then handheld sanders revealed that the built-up coatings were more than a match for our tools. The layers of varnish quickly clogged sandpaper, and hidden nails blocked progress with the planer for fear of chipping the blade. But a much easier solution quickly presented itself: flip the table tops over. Four easily-removed bolts secured each top to the base, and with them out of the waywe found bottom surfaces in near-mint condition. Some wood filler, scrapers, and a little bit of sanding took care of years of holes and gum within minutes.
Our other challenge, then, was to mount the vises. The vises had originally been mounted with lag screws, which, while solid, will (and had) eventually strip out a hole. So instead of screws, we used carriage bolts to secure the vises through the table. The bolt heads were counterbored – sunk into the tabletop so as to sit flush – and secured on the bottom with nuts and washers; additionally, the vise faces were screwed into the table face. This secure mounting mechanism will allow the hardware to be continually re-tightened whenever it loosens, something not possible with lag screws. The finished workebenches were much more solid, smooth, and easily usable – and stylish to boot.
Taegan Williams:
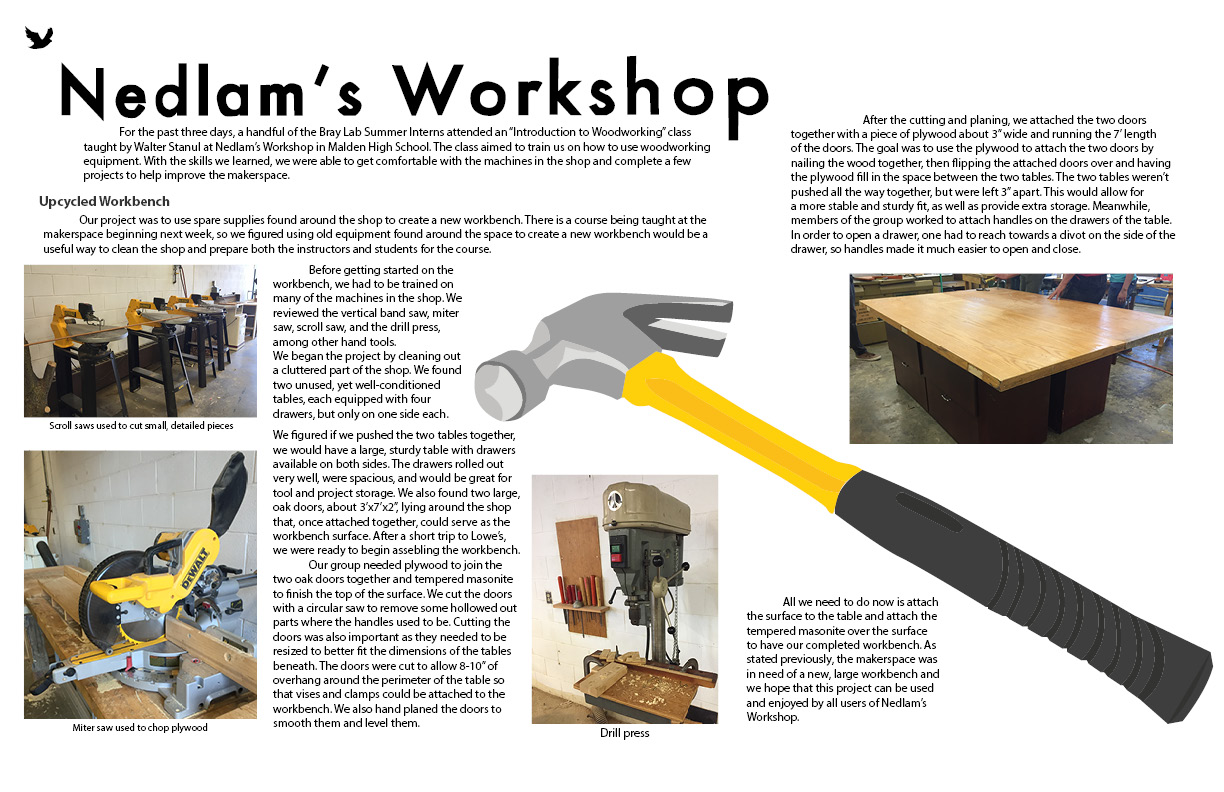
For the past three days, a handful of the Bray Lab Summer Interns attended an "Introduction to Woodworking" class taught by Walter Stanul at Nedlam's Workshop in Malden High School. The class aimed to train us on how to use woodworking equipment. With the skills we learned, we were able to get comfortable with the machines in the shop and complete a few projects to help improve the makerspace.
Upcycled Workbench
Our project was to use spare supplies found around the shop to create a new workbench. There is a course being taught at the makerspace beginning next week, so we figured using old equipment found around the space to create a new workbench would be a useful way to clean the shop and prepare both the instructors and students for the course.
Before getting started on the workbench, we had to be trained on many of the machines in the shop. We reviewed the vertical band saw, miter saw, scroll saw, and the drill press, among other hand tools. We began the project by cleaning out a cluttered part of the shop. We found two unused, yet well-conditioned tables, each equipped with four drawers, but only on one side each.
We figured if we pushed the two tables together, we would have a large, sturdy table with drawers available on both sides. The drawes rolled out very well, were spacious, and would be great for tool and project storage. We also found two large oak doors, about 3'x7'x2', lying around the shop that, once attached together, could serve as the workbench surface. After a short trip to Lowe's, we were ready to begin assembling the workbench.
Our group needed plywood to join the two oak doors together and tempered masonite to finish the top of the surface. We cut the doors with a circular saw to remove some hollowed out parts where the handles used to be. Cutting the doors was also important as they needed to be resized to better fit the dimensions of the tables beneath. The doors were cut to allow 8-10" of overhang around the perimeter of the table so that vises and clamps could be attached to the workbench. We also hand planed the doors to smooth them and level them.
After the cutting and planing, we attached the two doors together with a piece of plywood about 3" wide and running the 7' length of the doors. The goal was to use the plywood to attach the two doors by nailing the wood together, then flipping the attached doors over and having the plywood fill in the space between the two tables. The two tables weren't pushed all the way together, but were left 3" apart. This would allow for a more stable and sturdy fit, as well as provide extra storage. Meanwhile, members of the group worked to attach handles on the drawers of the table. In order to open a drawer, one had to reach towards a divot on the side of the drawer, so handles made it much easier to open and close.
All we need to do now is attach the surface to the table and attach the tempered masonite over the surface to have our completed workbench. As stated previously, the makerspace was in need of a new, large workbench and we hope that this project can be used and enjoyed by all users of Nedlam's Workshop.