Event-Driven EV3
Why Event-Driven EV3?
New EV3 users often encounter challenges translating their ideas into functioning code. It seems, intuitively, like the solution to certain problems should be obvious, but it is actually syntactically complex. One such problem is how to perform an operation whenever a certain input happens (for example, play a sound whenever a button is pressed). The solution using procedural program flow requires constant polling using a while loop (likely with switch cases if more than one value needs to be polled for). These data structures, while fundamental to computer programming, can be daunting to new programmers.
A new programmer's first coding experience is often with a procedural system: operations happen in a set order. Yet, the real world is full of systems and processes interacting concurrently, like a state machine. Our proposed event-driven model reflects this reality, putting state changes front and center in each program. Our goal is to create a streamlined interface for event-driven programming, replacing the while-loop-and-case-statement structure and thus lowering the syntactic barrier-to-entry.
Our event-driven paradigm encourages builders to design robots based on sensor inputs, resulting in more extensive use of the kit’s sensors. It puts the focus of robot design on physical robots rather than on code. Our system is intended primarily as an introduction, an easy way to get a robot to behave how you want it to.
EV3 IoT + Event-Driven Programming.pdf
Demos
Demonstrations of robots using the new event-driven model:
Elephant
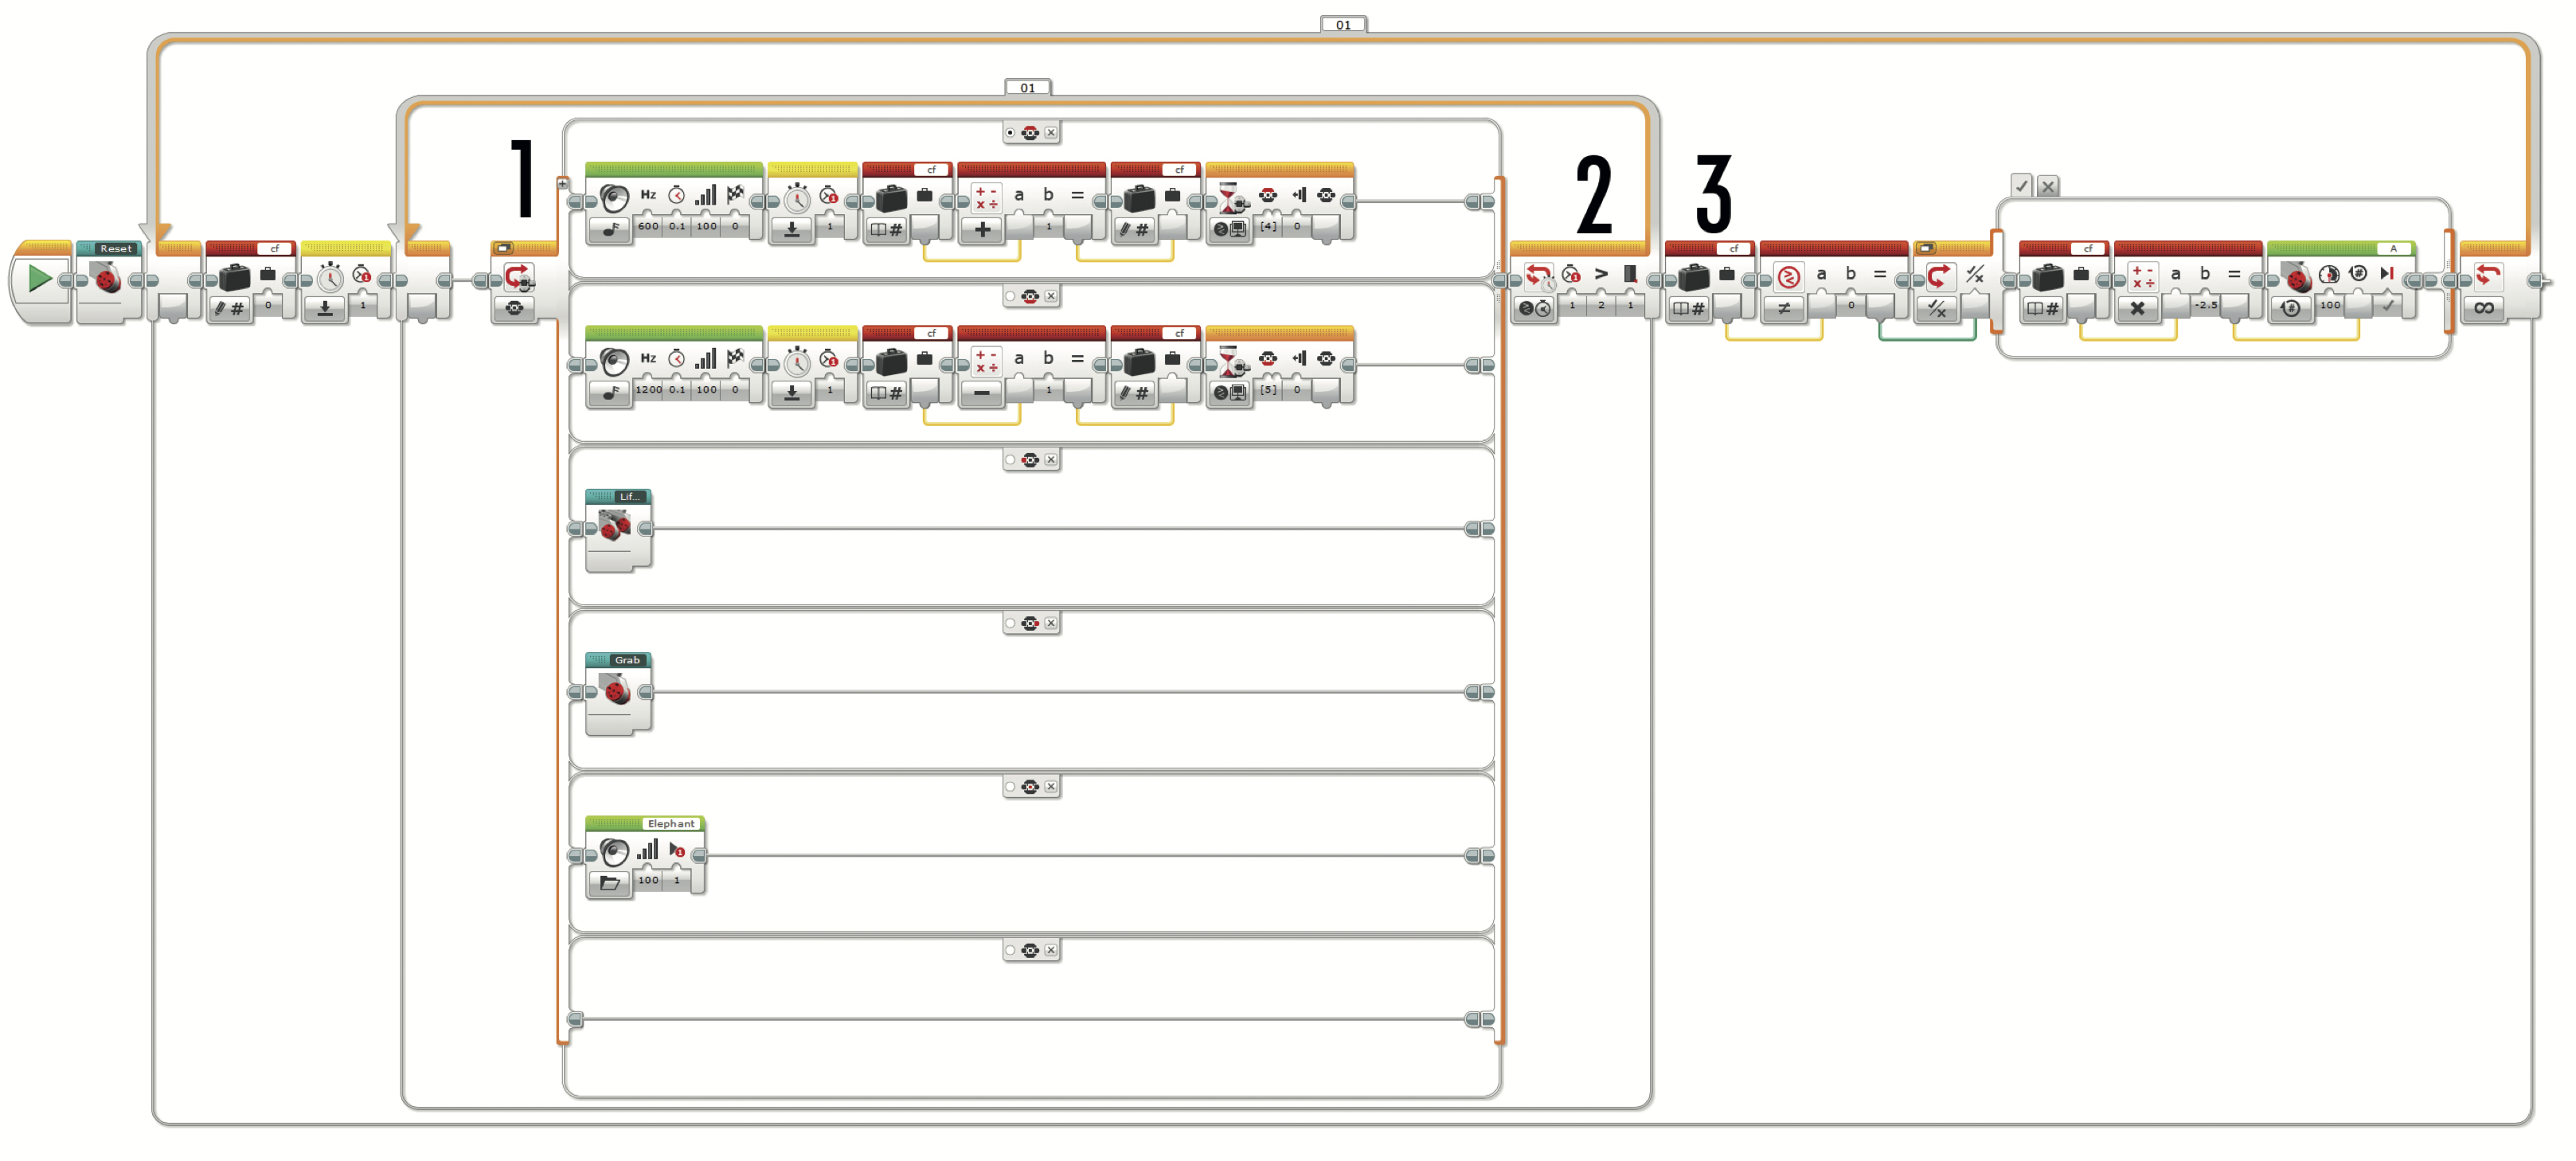
The LEGO MINDSTORMS Education EV3 Expansion Set includes building instructions and software to construct and program a robotic elephant. The elephant is operated by the buttons on the EV3 Brick, which are used to prompt 4 core behaviors.
- Walking
- The up and down buttons correspond to the elephant taking one forward or backward step respectively.
- Sound
- The center button plays the "Elephant call" sound file.
- Lift & Roar
- The left button raises the elephant's trunk and head, plays the "Elephant call" sound, then lowers both back to their start position.
- Grab
- The right button causes the elephant to reach down and, in slow, preset motions, curl its trunk around anything in front of it and lift it up.
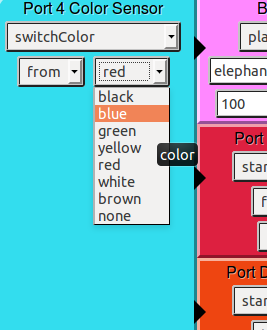
A touch sensor and a color sensor are used in the Lift & Roar behavior to prevent over-rotation and gear jamming at the upper arc of the trunk and head's range of motion. The touch sensor is used as a stop-block for the trunk gear-chain—stopping the trunk's motor once it rotates up far enough to press the button. Similarly, the color sensor is positioned behind the elephant's head and is used to stop the head motor once it reaches it's maximum angle.
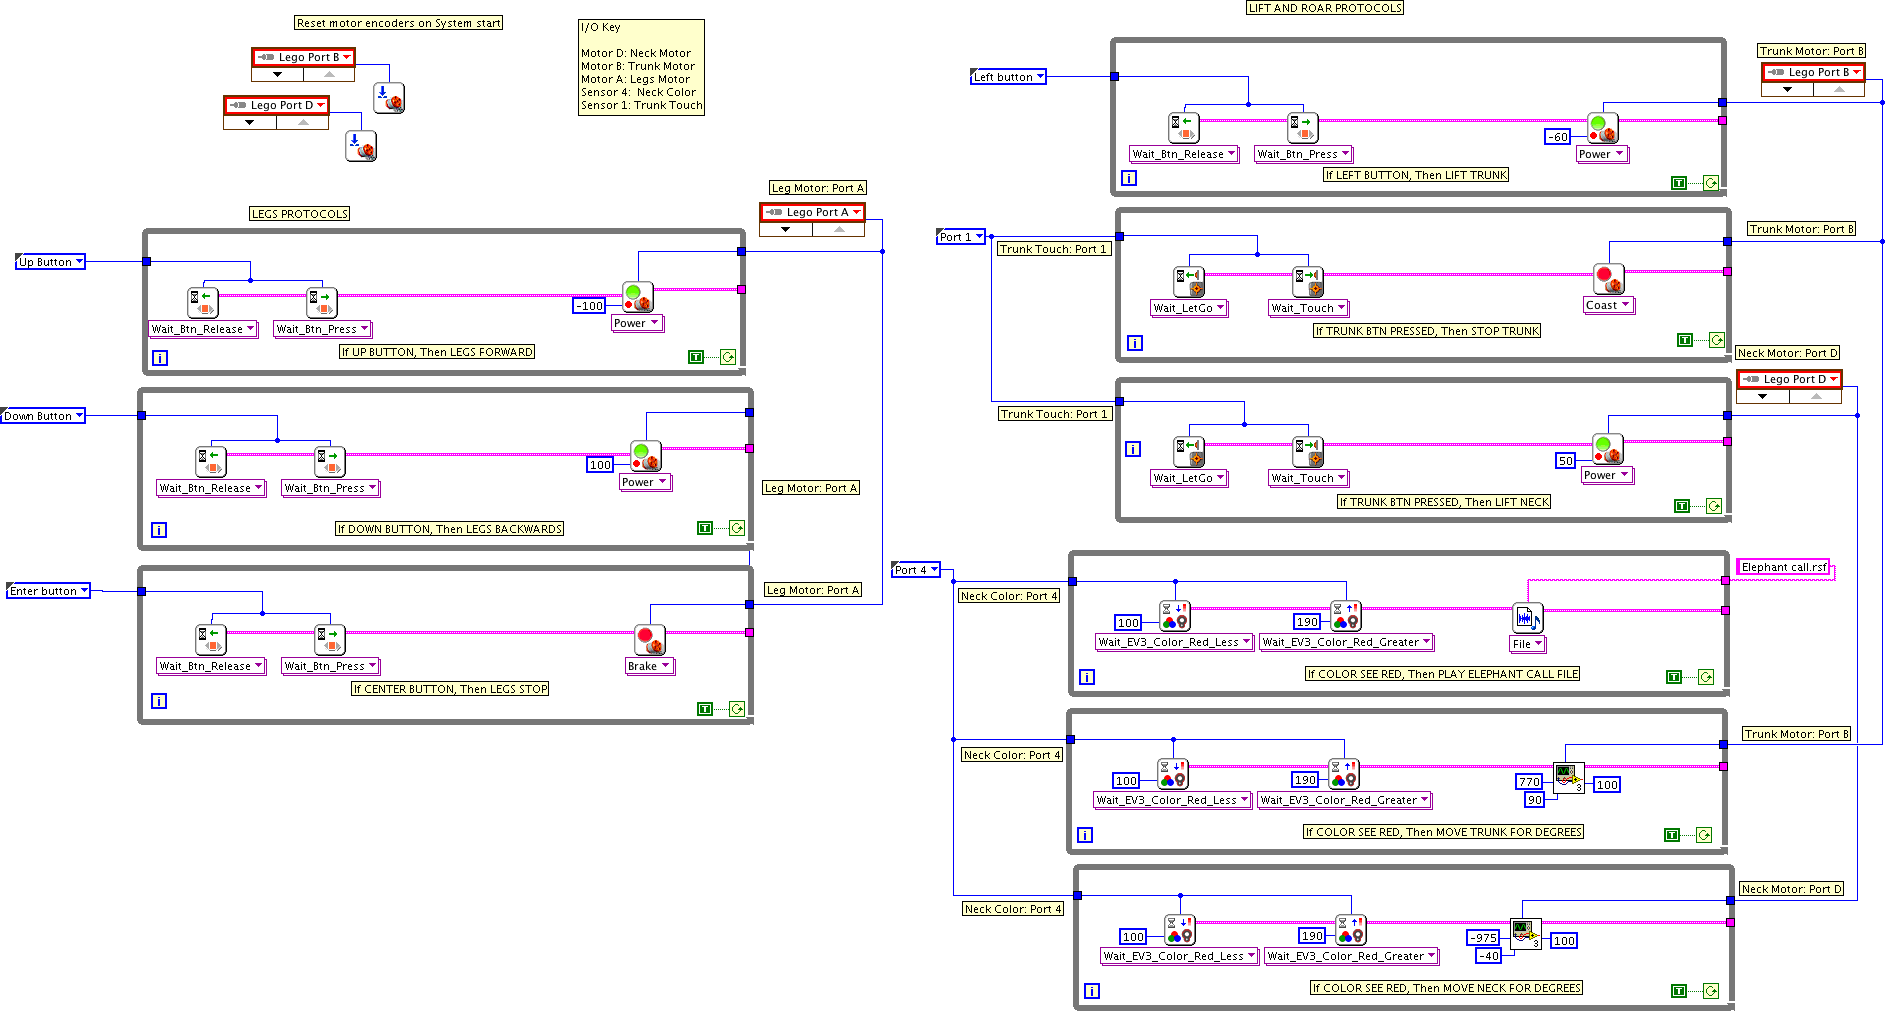
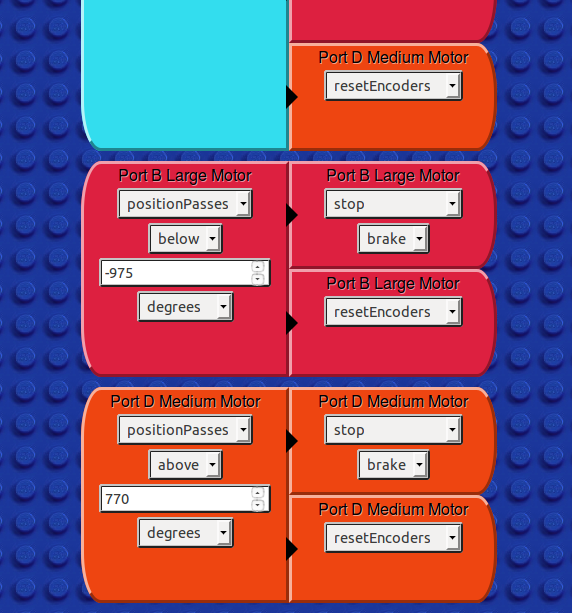
The pre-written code is very advanced, with special logic to count button presses and take that many steps, custom-made functions, and variables. Our demo code matches the forward and backward walking and the lift and roar commands. The up and down buttons map to a continuous forward or backward walking, while the center button is remapped to stop walking. The left button lifts the head and trunk, plays the elephant call sound, and then lowers the head and trunk back to its starting position.
Our demo program, seen below, implements 3 of the 4 core behaviors using only nine If-Then statements.
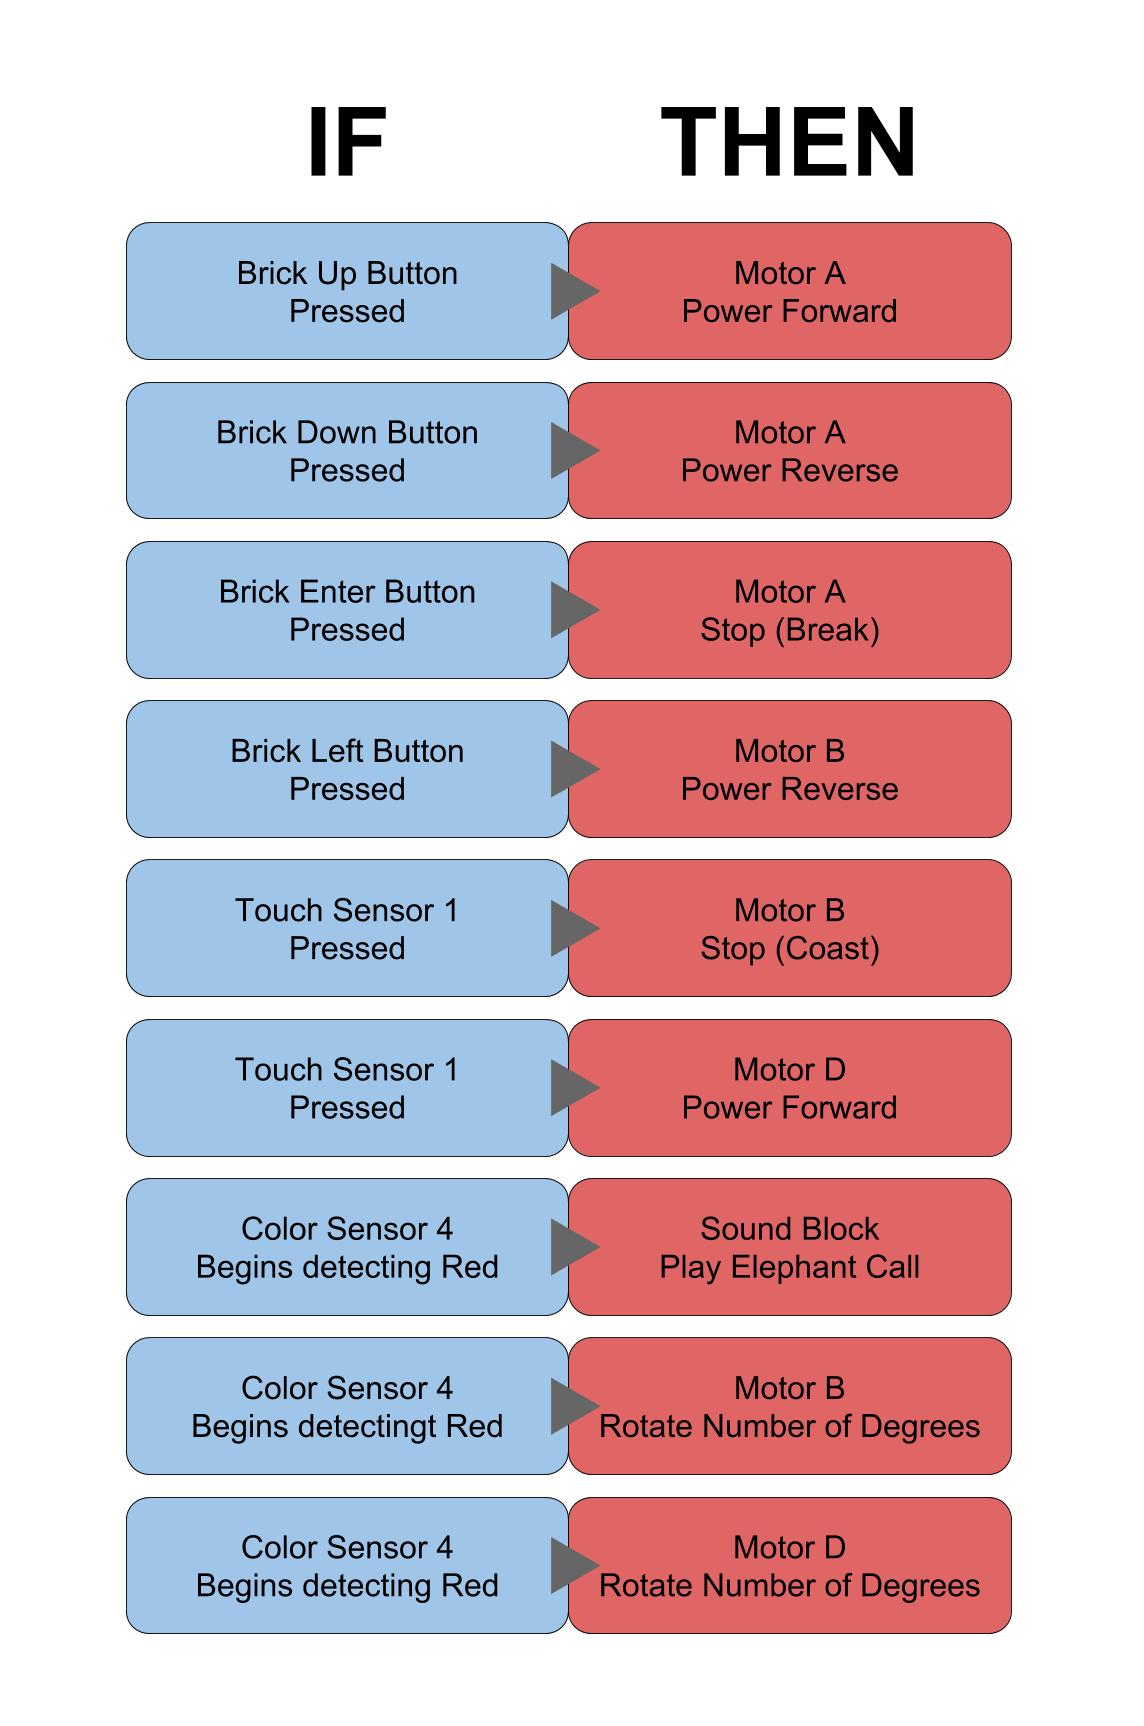
Note that we did not implement the Grab behavior as described above. Our current model doesn't support any way to make sensor inputs trigger different actions under different conditions. We are looking into this, though. We also ignored the step counting feature for forward and backward walking, since we didn't consider it essential to the demonstration.
LabVIEW's multithreading capabilities allow us to recreate the behaviors of the Elephant program in an event-driven framework. The following LabVIEW program emulates the asynchronous control flow of the block diagram above.
For comparison, below is the pre-written Elephant program from the LEGO MINDSTORMS Education EV3 Expansion Set.
Useless Machine
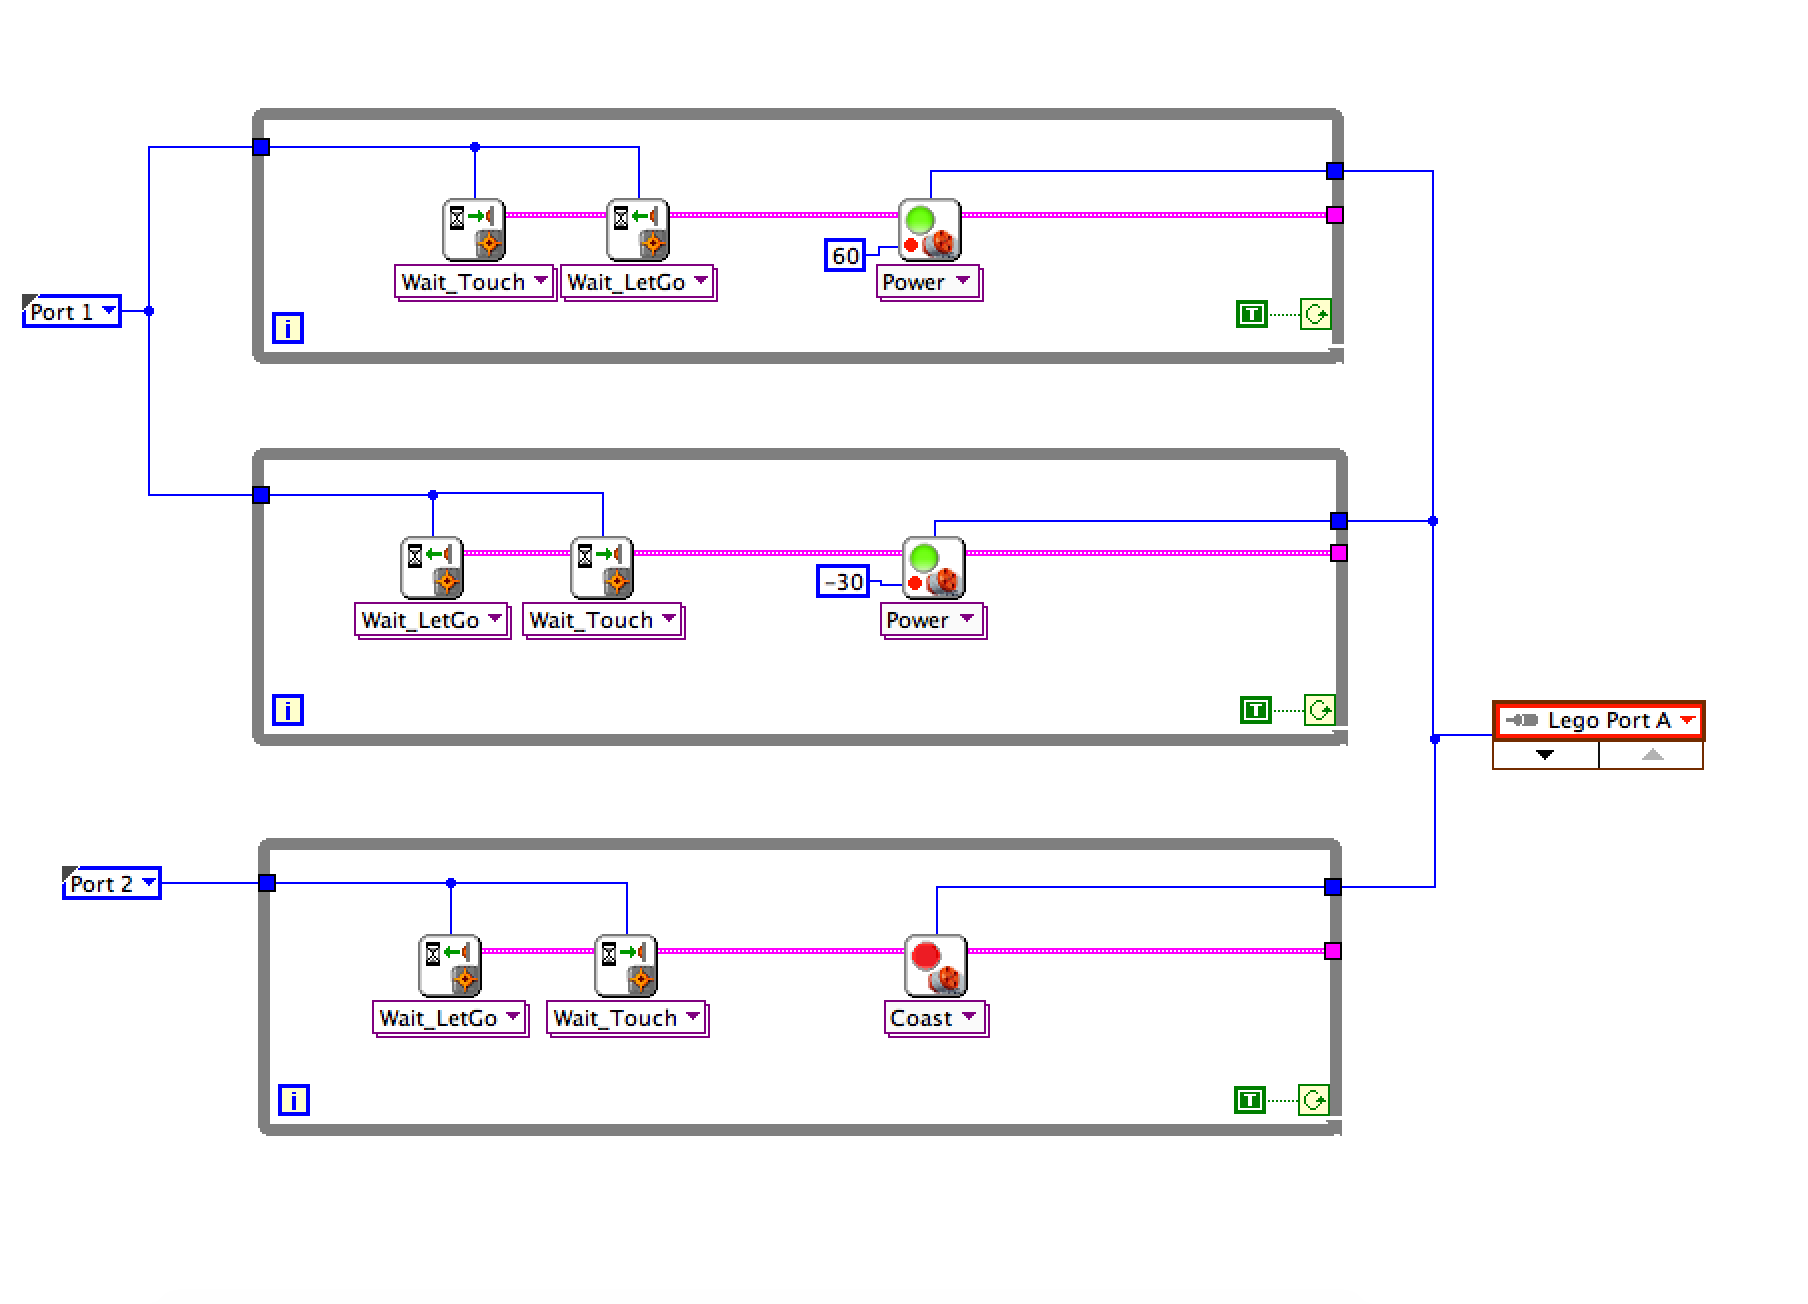
The Useless Machine is a robot that could be easily converted to the IFTTT model. The idea is that when a switch is toggled, an arm reaches up and toggles the switch back. Thus, the machine "turns itself off."
When the switch, which is attached to a touch sensor, is toggled, the arm begins moving to push it back. When it's toggled the other way, the arm begins retracting. We included a touch sensor at the back end of the arm's arc; when that sensor is pressed, the arm stops retracting.
A "trigger" differs from sensor data in that a trigger is a state change, not just a state value. Here, the triggers are: the port 1 touch sensor changing to released, the port 1 touch sensor changing to pressed, and the port 2 touch sensor changing to pressed. The "actions" all toggle the motor's state.

LabVIEW supports limited multithreading, allowing us to emulate our desired behavior with LabVIEW:
For comparison, here is LabVIEW code for the Useless Machine in a procedural model:

Since this code is not multithreaded, the touch sensor states can be traced through the code. This lets a more experienced user simplify the program by removing extraneous WaitFor blocks, but also makes the actual state changes less clear, decreases modularity, and makes the structure harder for a new programmer to understand. Note that while the LabVIEW mockup of our model has more blocks, it is far more modular in structure, and easier to debug.
Future
Here are some ideas for where this project might go in the future:
- Make a version of the current prototypes where the code processing is delegated to the EV3 intelligent brick.
- Add a comprehensive tutorial.
- Extend the event-driven interface to more systems, such as the GrovePi sensors for the Raspberry Pi. (described below)
- Fully join the Internet of Things by adding support for inter-device communication over WiFi.
- Make a generic system that allows devices to inform the browser of possible settings. This would let users configure their own smart devices to be compatible with this interface.
- Add support for conditional blocks that can be placed between triggers and actions to implement Boolean Logic and raise the ceiling of the interface.
Extension to Other Systems
Right now, the event-driven interface was designed with the LEGO MINDSTORMS EV3 system in mind. However, we eventually want to extend the interface (and the whole event-driven paradigm along with it) to more systems.
One system that we have been looking at is the GrovePi sensor suite for the Raspberry Pi computer. We've made a quick proof-of-concept prototype demonstrating that a browser application can communicate with the sensors in a similar way to how it communicates with the EV3. The only thing that would be needed to extend this system completely is a more generic interface.
One interesting direction that this could take is a completely generic interface that doesn't know about any specific systems. When connecting to a device, that device could send lists of configuration info to the browser running the interface. This would put the burden of supporting this interface on the connected devices, rather than the interface itself, and allow for advanced users to set up their own custom systems that can interact with the same interface.
Prototyping
So far, all of the interactive prototypes are made as HTML documents, for easier integration with web-based systems in the future (e.g. Internet Control EV3, Distributed EV3).
For example, the image shown below is an early mockup of a three-column layout, using drop-down menus to select I/O ports.
Here is a link to our GitHub repository where these interfaces may be downloaded.
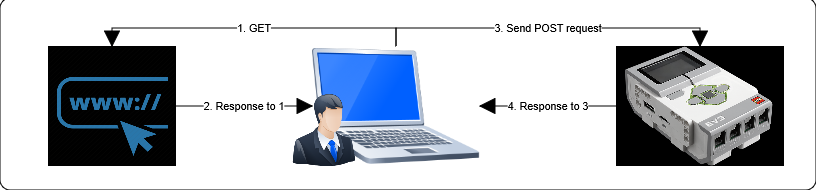
Communication Proof of Concept

Goals:
- Run event-driven programs on the EV3
- Send data from the browser to the EV3, with the browser as the processing hub ("smart browser, dumb brick")
- Hook up a prototype interface to the EV3
- Begin integrating with the "EV3 Python Programming" project
Functionality:
- Built off of the Configurable Interface chassis
- Code can be sent to a specific URL with a button press
- The program can be stopped with a button press
- Processing is done in the browser; the browser establishes a connection to the brick and repeatedly polls it for WHEN state changes, telling it to execute the corresponding THEN actions.
Findings:
- As much processing as possible should be done on the EV3 Intelligent Brick
- Web traffic should be minimized to reduce lag and errors
- The configurable interface supports a good level of basic functionality, but should potentially be extended further
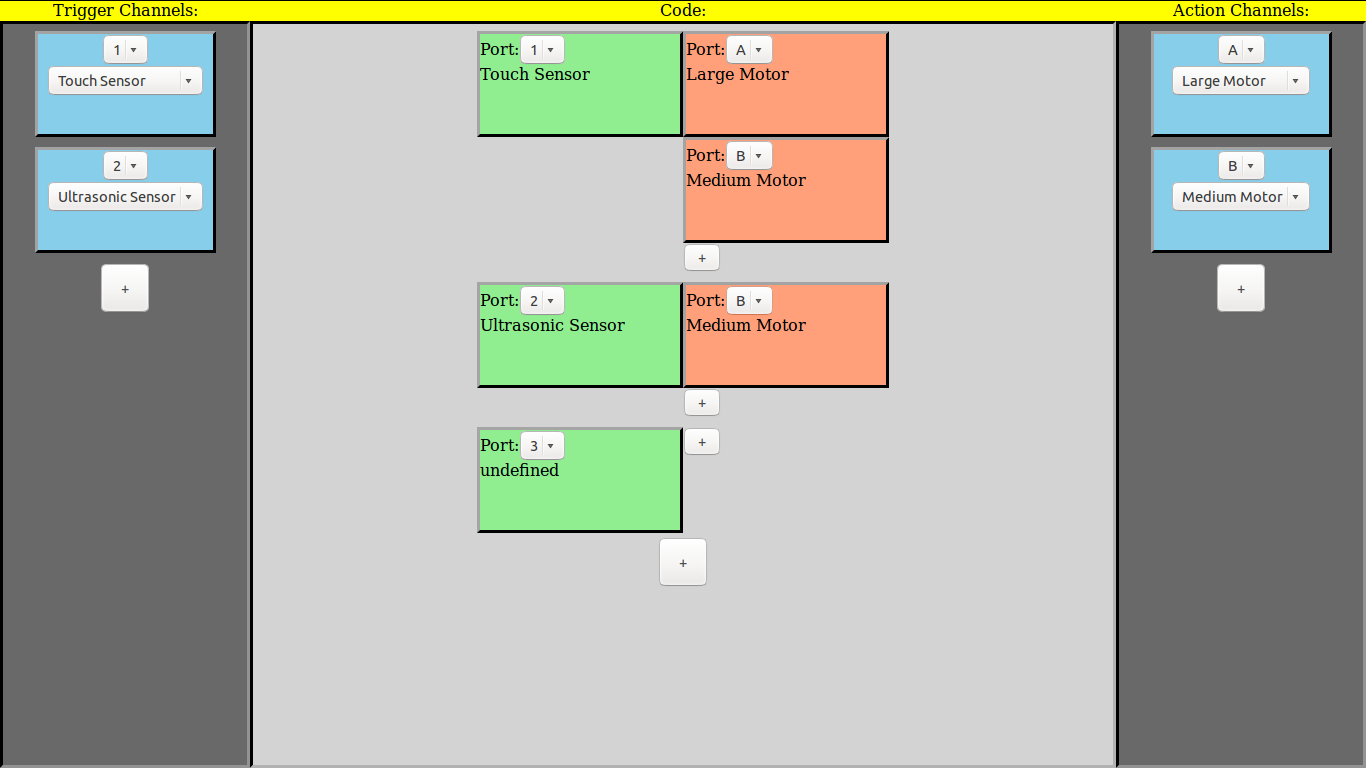
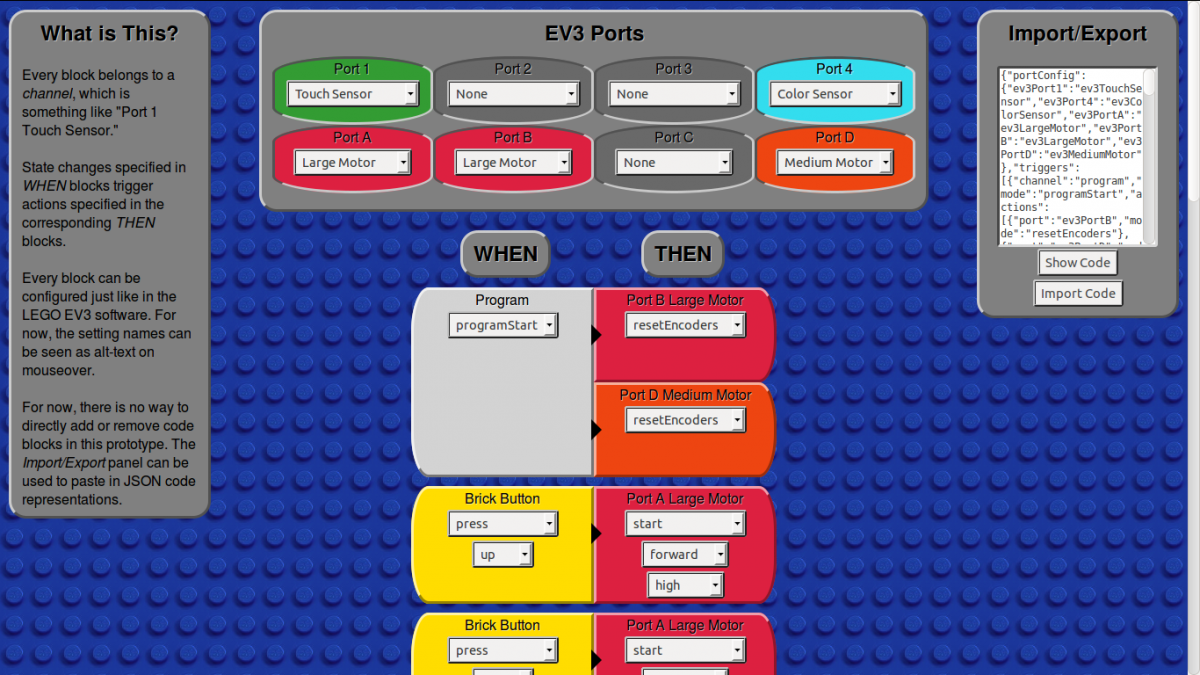
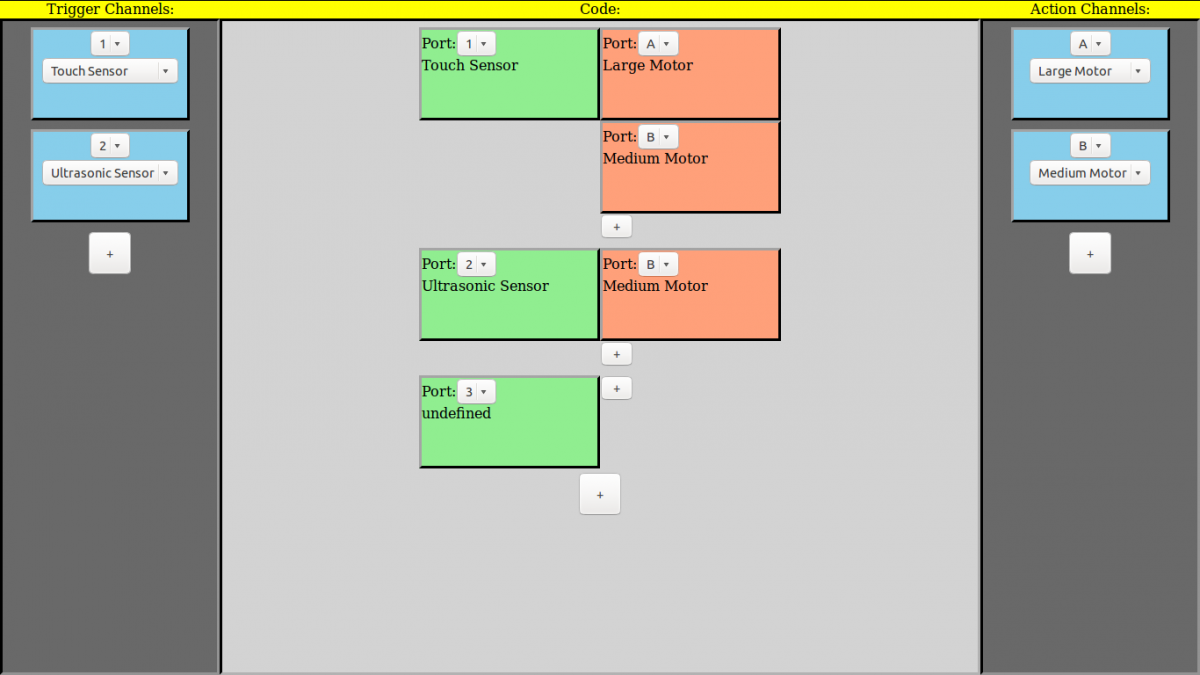
Configurable Interface
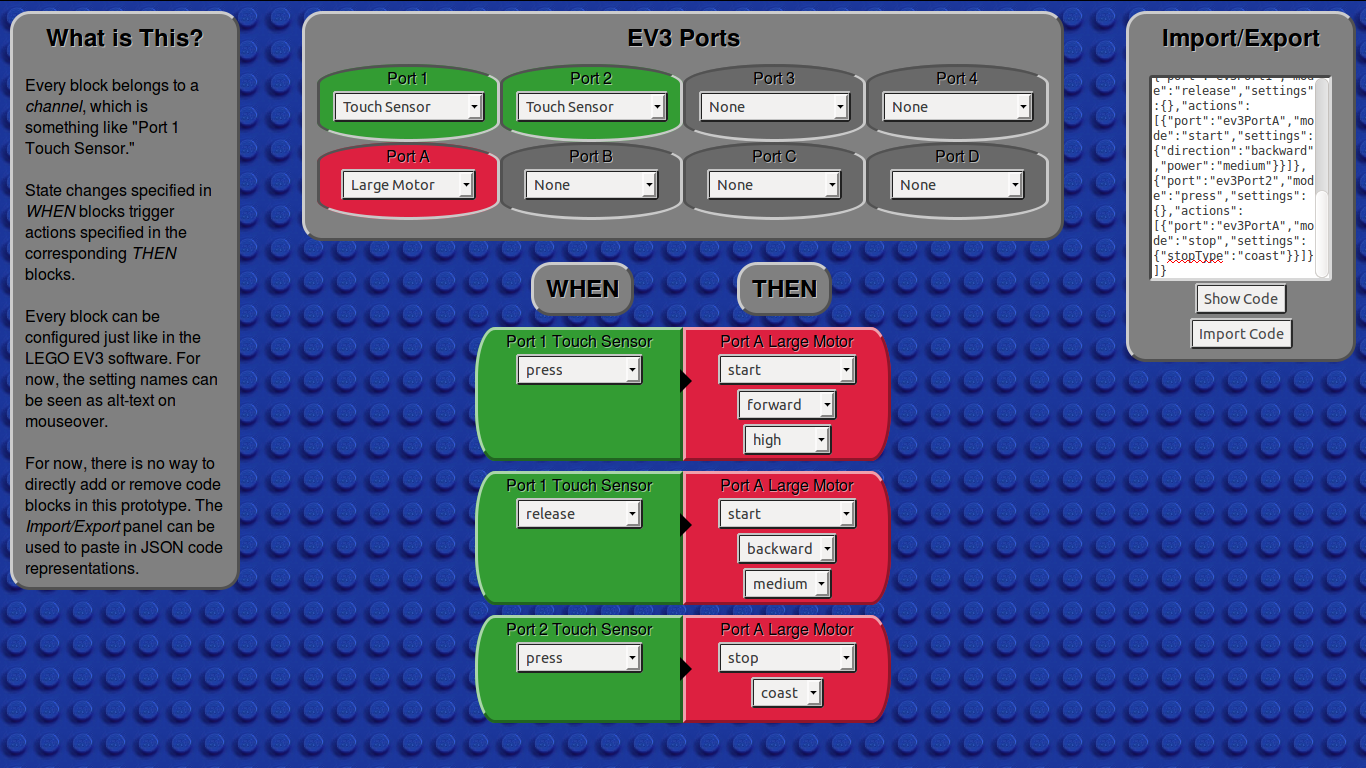
Goals:
- Start adding functionality to the interface. Unlike the previous prototype, which was only intended to test the GUI, this prototype also can export its data to other modules of the project
- Experiment with a global port configuration panel
- Make an interface which is better bound to an internal data model
- Make code blocks which can be configured
- Make an interface which can do everything but drag-and-drop, to complement our drag-and-drop prototype
- Avoid using technologies that limit compatibility
Functionality:
- The interface is directly bound to an internal model
- Code models can be imported (as a JSON string)
- Code models can be exported (as a JSON string)
- Ports can be reconfigured; changes propagate through the entire interface
- Code blocks can be configured
- Each block has a mode setting, which determines what other fields are shown
- For now, the setting names can be seen as alt-text on hover
- Cross-compatible with many browsers
Findings
- Settings for the EV3 brick in particular (sensor and motor names, modes, port data, etc.) can be bundled together into a module.
- This would let us potentially make a more generic system that reads in settings from the device itself!
- Bright, colorful backgrounds are annoying.
- A proper model-view-controller structure makes it much easier to tweak the functionality over time.
- Every configurable code "block" (a WHEN or THEN block) can be boiled dowto contain the following information:
- A channel (such as "Port 2 Color Sensor" or "Brick LED")
- An operation mode
- Several other fields, which are determined by the mode
- Color-coding blocks by channel works great. A little thumbnail picture would be good too.
- A little blurb in the margin explaining the scope and purpose of the prototype is helpful.
- AngularJS is cross-compatible with many browsers, but a lot of its features require that the document be hosted on a server.
- The interface can be a separate module from all of the communication systems.
- A global port configuration panel eliminates many potential problems from LabView and the LEGO MINDSTORMS software.
- Arrows between the WHEN and THEN blocks help make the interface more readable.
- Rounded corners look good.
Non-standard Technology Used:
- AngularJS (for data binding in this single-page application)
Compatibility:
- Must be run on a server (except in Firefox, where just double-clicking on the .html file works)
Download link:
[To Be Added]
Gallery

Drag and Drop Interface

Goals:
- Test a drag-and-drop interface made in an HTML document (for future web communication compatibility)
- Test the three-column layout for channel banks
- Experiment with various ways to add and remove code blocks
- Experiment with visual cues for drag and drop operations
Functionality:
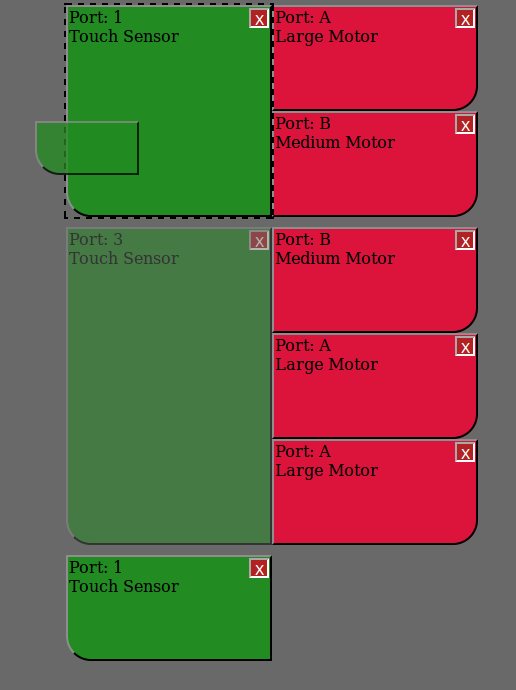
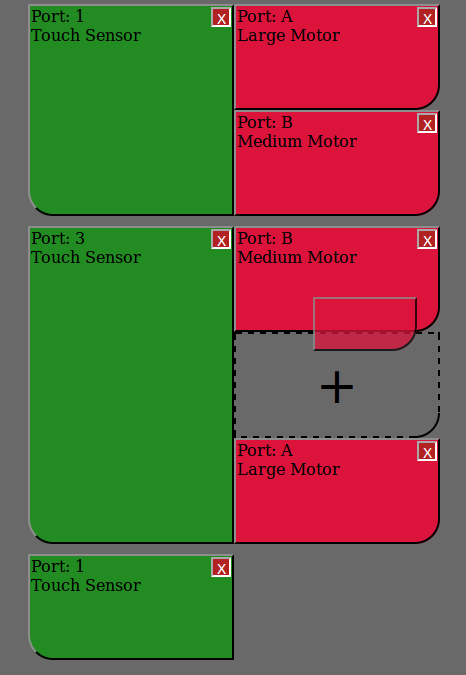
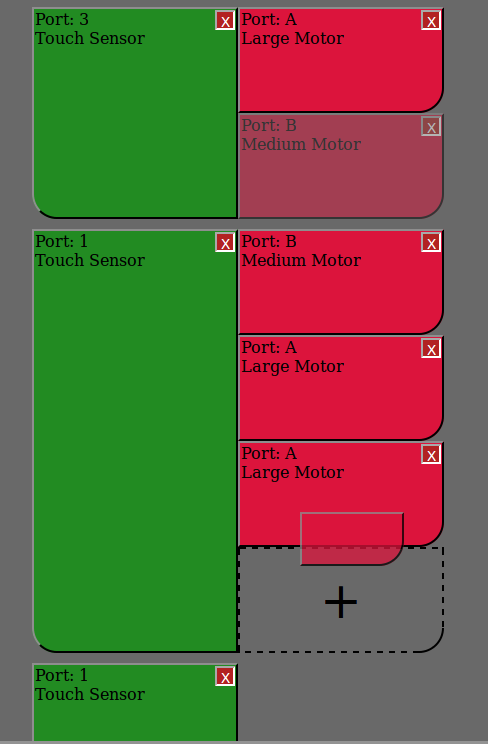
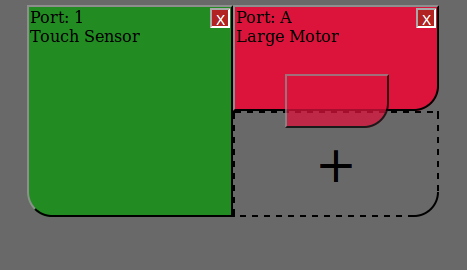
- Sensor and motor channels can be added as needed in their respective columns.
- Channel port values can be configured; this is important because channels are tracked by port in this model.
- Peripherals can be set for each channel; changes to peripherals propagate throughout the interface.
- Code blocks can be dragged onto the code area from the channel blocks
- Each trigger can hold multiple actions
- Triggers can be swapped
- Actions can be moved and reordered
- Everything can be dynamically deleted
Findings
- It's good that we always make the drop zone outlined with dashes, but it would be better to always be able to actually drop the item directly onto the indicated area.
- Rounded corners would look better (and would make dragging more obvious).
- It would be better to make the cause->effect relations explicitly shown (with arrows?).
- The code block area should say "Drag Here" while empty.
- Make non-droppable areas more obvious.
- The port value (which is used as the identifier for the channel) should either be constant or resettable everywhere in the interface.
- All buttons should be labeled ("+" doesn't cut it).
- Adding boolean logic blocks (conditions on the triggers which are required for the actions to run) will require an overhaul of the drag-and-drop layout.
- The names "trigger" and "action" are too close to IFTTT; we should call them "WHEN" and "THEN" instead.
- It might be better to drag to a "trash can" than have a delete button on every block.
Non-standard Technology Used:
- HTML5, for the drag-and-drop events
Compatibility:
- Firefox 3.5+, IE 9+, Chrome 4+, Opera 12+, Safari 6+
- Can be run by just double-clicking; no server necessary
Download link:
[To Be Added]
Gallery:


Interface Sketches
Gallery of preliminary sketches of potential interface layouts
Research
Research on the event-driven paradigm in relation to our interface:
IFTTT Research
If This Then That (IFTTT) is a web service that connects various other web services together with a simple conditional interface. It allows users to link a triggering event on one website to an executable action on another website. IFTTT calls these triggering events "triggers" and the executed events "actions." The combination of a trigger and an action is called a "recipe."
Here are some example recipes:
- Get the weather forecast each morning. Email it to me.
- When my phone battery is low, change the smart lightbulbs in my house to red.
- When an item I'm looking for appears on eBay, text me.
- Tweet every time I change my Facebook status.
IFTTT is adaptable — the same simple interface is applied to every connected service. Recipes are constructed in an unskippable seven-step tutorial. The steps are simple and general enough to allow for flexibility: pick the services to connect, choose the trigger and action, and customize the trigger and action.
However, the service is not perfect. For example, the recipe creation process, while easy to follow, quickly becomes tedious.
Some of our takeaways from researching the service, which has an interface similar to what we're going for:
- Large colorful interface is good.
- Little fiddly bits are intimidating
- Concurrency is required.
- Need triggers from multiple sources to be available at the same time.
- The channels on IFTTT.com are analogous to the Mindstorms sensors/motors
- Clear distinction made between the triggers and the actions.
- Triggers are always state changes, not state values (weather changes to X, for example)
- Tutorial mode that walks you through the process of setting up a simple trigger-action pair.
- Avoid non-descriptive imagery
- We will probably want descriptive icons that say what the “recipes” do at a glance
- A sequential recipe-building interface is overly limiting and tedious
- Being able to select the trigger and action at the same time would be better
- IFTTT polls some channels as infrequently as every 15 minutes
- This causes long delays; we’ll want to keep server load in mind
- Only one action per trigger isn’t enough
- We will probably want to link sequences of actions to single triggers, too
- IFTTT has no support for more complicated logic or math.
- We want AND and OR for compound triggers
- We’ll want to support more math, support variables, etc.
- Forcing a tablet interface onto traditional computers is a bad idea
- We need a good navigable menu system. Search doesn’t cut it.
- Maybe there should be some way to see the functionality of a component before adding it
For more detail, see our video analysis of IFTTT:
EV3 Research
Since "triggers" are state changes, not state values, the list of valid triggers differs from the list of valid sensor inputs (note that this list may not be exclusive):
- Program start
- Touch sensor becomes pressed/released
- Touch count exceeds a certain value
- Color sensor registers change to a specific color
- Ambient or reflected light level passes a threshold
- Measured distance from ultrasonic sensor passes a threshold
- Gyro sensor rotates past a specific angle
- Gyro sensor rotation rate passes a threshold
- Motor rotates for a certain number of degrees
- Brick button pressed
We also brainstormed several actions:
- Toggle motor on/off
- Turn motor on for time interval
- Turn motor on for specific number of full rotations/degrees
- Play a specific sound
- Stop playing sound
- Set motor power level
- Terminate program
- Toggle Brick lights
- Print text to Brick screen
The existing programming structure that our interface will simplify is a top-level while loop which contains case statements. In the meantime, LabVIEW and the LEGO MINDSTORMS Software have some limited multithreading capabilities which can be used to emulate our desired interface. This will allow us to demonstrate the capabilities of the event-driven model.