Laser Cutting
This handbook covers everything you need to know about laser-cutting stuff at Tufts.
Laser-cutting is, for the most part, two-dimensional. You can either cut through something or etch a nice drawing on the top. You can't easily sculpt the material to your liking. For that, the CNC milling machine would be the tool to use.
Laser cutting uses a focused invisible infrared beam to vaporize materials such as wood, paper, and acrylic to cut through or etch a piece of material, depending on the settings used. The read beam you may see when laser cutting is an aiming laser; the cutting beam is not visible.
Warning: Although the laser itself isn't likely to hurt you, chemicals released by vaporized material definitely can. Be sure to research any plastics or glued wood to check if they produce chlorine gas when vaporized.
How laser cutters work
- 2 stage IR laser tube
- Electricity excites HE
- He excites CO2
- One fixed mirror
- Mirror at end of gantry
- Third mirror on cart
- Focusing lens in nozzle
Controlling a Laser
- X-Y gantry moves the mirrors to focus energy at different points
- Energy delivered to the material is determined by the laser power, speed, and frequency
Focusing a laser
- The laser beam must be focused to make accurate cuts
- Focal length is from the top of the lens to the surface of the material
- Use the focusing stick to adjust
Cutting vs Etching
- Laser cutting
- Heated enough, material will vaporize leaving a void
- Laser etching
- At lower energy levels material will burn, melt, or vaporize less than all the way through
- Other lasing options
- Curing, sintering, or tempering
Raster vs Vector
- Raster graphics use an array of values for representation
- Pixels in a picture
- Vector graphics describe position, direction, curvature
- From point A to point B
- Laser etching of raster images works like a dot matrix printer varying pulses across a line
- The Zing can print in vector, raster (etch), and combined modes
Materials
Generally, wood, paper, acrylic plexiglass and leather can be cut safely.
PVC, vinyl, or heavy metal can release dangerous chlorine gas.
File format
- For laser cutting, the file should be in SVG (Scalable Vector Graphics) format, which defines an image as a series of points, lines, and fill, rather than the pixel format used in programs such as Photoshop
Adobe Illustrator, Inkscape, CorelDraw are all vector editors.
Preparing your file
Before you come to Jumbo's Maker Studio, prepare your SVG file using a vector drawing program such as Adobe Illustrator or Inkscape.
The acrylic sheets available in some of Tufts' makerspaces are 12" high by 24" wide. You may want to set this as your artboard size when creating your vector drawings.
Safety rules
Never let a machine run unattended! If a material catches on fire, open the door, hit stop, and douse it using the nearby extinguisher. You should never cut unapproved materials to reduce the likelihood of this happening.
Starting the system
Turn the laser cutter on with the rocker switch along the right-hand side of the laser.
Setting up a document

There are a few considerations.
Vector vs Raster
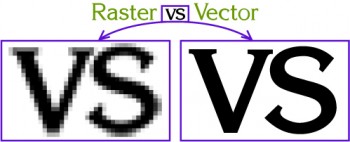
A vector file can be scaled without distortion. A raster image will appear pixelated and blurry.
Raster images are images that are made of pixels - like the ones you take with your phone. If you zoom way in on one of your photos, you'll eventually begin to see the individual square pixels that make up the image. JPG, PNG, GIF and TIFF are all examples of raster image formats.
Vector graphics aren't made of pixels; they're made of math and coordinates. You can zoom way in on the edge of a vector graphic and it'll never look blurry, because it doesn't use hard-coded pixels to display itself. This is why many logos and icons are created as vector graphics; they can easily scale up to be on a billboard and never look blurry along the edges.
This difference is important in the context of laser-cutting. The laser cutter can only cut along vector lines because they're essentially just coordinates and not pixels. Raster lines or graphics are etched into the surface of the material instead.
Using Adobe Illustrator you can convert a raster image into a vector image, but you occasionally get weird results.
Vocabulary
-
Vector: The form of line used in Illustrator to denote lines to be cut. It can be extended or rotated and maintain the same dimensions without distortion.
-
Raster: Any other part of the image that is not going to be cut. These areas are etched. Each pixel in a raster has its own color value.
-
Stroke: A single line in Adobe Illustrator, as opposed to "fill" which a filled in area.
-
Layers: A grouping of elements in Illustrator. You are able to hide or delete layers as a group and therefore are useful for separating raster layers from vector layers.
- Image Trace: Traces the outermost lines of an image. This is useful for converting a regular image file into an item that can be cut out.
Basic File Setup
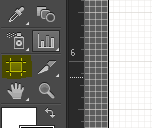
Use this tool to select an artboard. It can be resized once selected in the top ribbon.
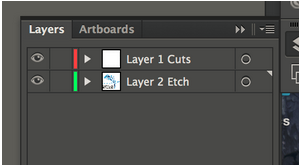
Separating the cutting and etching into 2 layers will make the file easier to work with.
- Import your file or start a new one. Adobe illustrator accepts formats like PNG, dwg, dxf, svg, jpeg, and more. If you are starting a new file, select "File" then "New..." or if you are importing a file, select "File" then "Open...".
- If the rulers are not already showing, select "View", then "Rulers", then "Show Rulers".
- Now right click the ruler and select "Inches".
- Next go to the Preferences and then Units and change all the units to inches.
- On the left select the artboard tool. Then crop the artboard using the dimesnions on the top ribbon.
- Change the dimensions to the laser cutter's work-space (Epilog Zing is 24in wide by 12in high).
When creating the file try to keep all lines meant to be cut in one layer and all lines meant to be etched in another layer. This will make it easier later when you can hide a layer and see all the vector (cut) r raster (etch) elements.
Vector Features (For Cutting)

A feature with a stroke of 0.001in will be treated as a vector and cut.
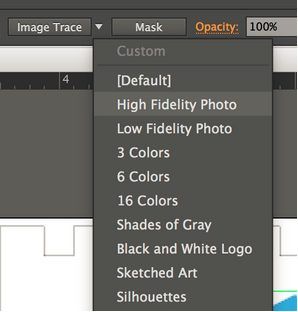
An image trace will automatically outline your image. This can then be expanded by a stroke of 0.001 in to create a vector feature to be cut.
NOTE ALL LINES TO BE CUT MUST BE VECTORS
Option 1: To create a CUT line, draw a line and set the stroke width to be 0.001in. The stroke options will be at the top or in the side menu with the horizontal bars.
Option 2: To convert a feature to a CUT, select your image and then choose "Image trace" from the top menu, use the drop down arrow to select the desired trace option. Select "Expand" and change the stroke width to 0.001in.
For troubleshooting later, include several random features (vector circles of diameter less than .5 inches ) that will fall through the support grid. This is to provide visual confirmation that the laser cut all the way through the workpiece.
Raster Features (For Etching)
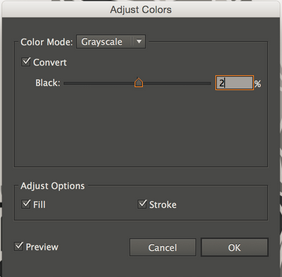
Use this menu to convert the image to a rastered grayscale.
ANYTHING NOT VECTOR WILL BE TREATED AS A RASTER
The laser works in grayscale so it will use maximum etching power on a black raster and willbe off for white or negative space.
- Either create an image in illustrator or import one. Images DPI depends on your laser cutter (Epilog Zing can etch at 500DPI) To import the image select "Place" from the "File" menu. This will place the image onto the illustrator document. It is helpful to make this document the size of your workpiece (Epilog Zing 24in x 12in).
- Once imported, convert the image to Greyscale or Black and White. Select "Edit", "Edit Colors", then "Adjust Color Balance" from the "Edit" dropdown menu.
- Now select greyscale as the color mode and check the "Convert" and "Preview" boxes. Then adjust the balance until you get the desired image.
Some materials will take grayscale etching better than others. The closer to pure black and white you can get the raster the clearer the difference will be between white and black.
Other raster based editors might be better for getting the desired black and white/grayscale in an image. If you are stuggling try Adobe Photoshop, Gimp, or Pixlr.
